ERPNext Custom Apps
In diesem Buch sammeln wir Infos für uns bekannte öffentliche Module und Apps welche für die Erweiterung des eigenen Systems eingesetzt werden können.
- Logistik Integration
- Zoom Integration
- Flottenverwaltung
- ipbx Integration
- Fertigung
- Qualitätssicherung
- IT Management
- ERPNextFinTS
- nextcloud Integration
- Hostel Gastgewerbe
- Item Translation
- PDF on Submit
- Alyf Banking
- Kefiya
- Webshop
Logistik Integration
https://github.com/lab51org/ERPNext-logistic
https://github.com/alfianpase/tms
https://github.com/HNaga/logistics
DHL
https://discuss.erpnext.com/t/dhl-shipment-integration/40442
Zoom Integration
https://github.com/askmetoo/erpnext-zoom
Flottenverwaltung
https://github.com/Nayar/frappe-fleet-management-system
ipbx Integration
https://github.com/Nayar/ipbxmanager/tree/master/ipbxmanager/ipbxmanager/doctype
Fertigung
https://github.com/hiousi/erpnext-spp
Qualitätssicherung
https://github.com/lasalesi/quality
IT Management
Network Interface Controller anlegen
Einleitung
Hier wird beschrieben was zu beachten ist wenn man Network Interface Controller (NIC) einem Configuration Item zuweisen möchte.
Voraussetzungen
Die custom App IT Management muss installiert sein.
Aus Configuration Item
Im Configuration Item gibt es die Tabelle Network Interface Controllers. Hier können alle Netzwerkschnittstellen des Geräts aufgeführt werden. Wesentliche Informationen sind hierbei die IP Adresse und die MAC-Adresse.

Damit die IP und die MAC angezeigt werden können, muss die NIC eigenständig angelegt werden und dann mit der Tabelle verknüpft werden. So haben wir die Daten als Read-Only in der Tabelle und gleichzeitig die NIC zum entsprechenden Subnetz verknüpft. Wir öffnen hierzu die Tablelle und erstellen eine neue NIC

Im Network Interface Controller selbst können dann alle notwendigen Daten eingetragen werden die einen Rückschluss auf das entsprechende Netz geben. Dort im Netz sind dann weitere Details zu VLAN, DNS, DHCP etc. zu finden.

| Nutze zwei Fenster um im einen die NIC zu erstellen um dann im Anschluss diese im Configuration Item zu verknüpfen. Das Feld Subnetz kann auch nach dem entsprechenden Kunden gefiltert werden. |
Verwandte Artikel
Verwandte Artikel erscheinen hier basierend auf den Stichwörtern, die Sie auswählen. Klicken Sie, um das Makro zu bearbeiten und Stichwörter hinzuzufügen oder zu ändern.
|
|
IT Software
Einleitung
Dieses Dokument wird für die Pflege der unterschiedlichen Software Produkte verwendet welche in den IT Landschaften verwendet werden.
Abgrenzung
- Die Installation einer Software wird über das Dokument Software Instance abgebildet
- Es können unterschiedliche Lizenzen einer IT Software zugeordnet werden
Prozess IT Support
- Sammel-E-Mailpostfach wie info@, support@ etc. kann, muss aber nicht in ERPNext eingebunden sein.
- Aus der E-Mail wird ein Anfrage, Lead oder Chance generiert. Dies passiert entweder über ERPNext und der "make" funktion, oder aber über das automatische erstellen aus einem E-Mailpostfach heraus (siehe dazu automatisches generieren von Anfrage, Leads oder Chancen über E-Mailordner)
- Die Anfrage wird zum ausführen der Tätigkeiten, Dokumentation und Kommunikation verwendet.
Licence
Einleitung
Mit dem DocType Licence halten wir Lizenzen in unseren IT Landschaften fest.
Lizenzen Dokumentieren
Hier am Beispiel einer Microsoft Office Home and Business 2019 Lizenz:
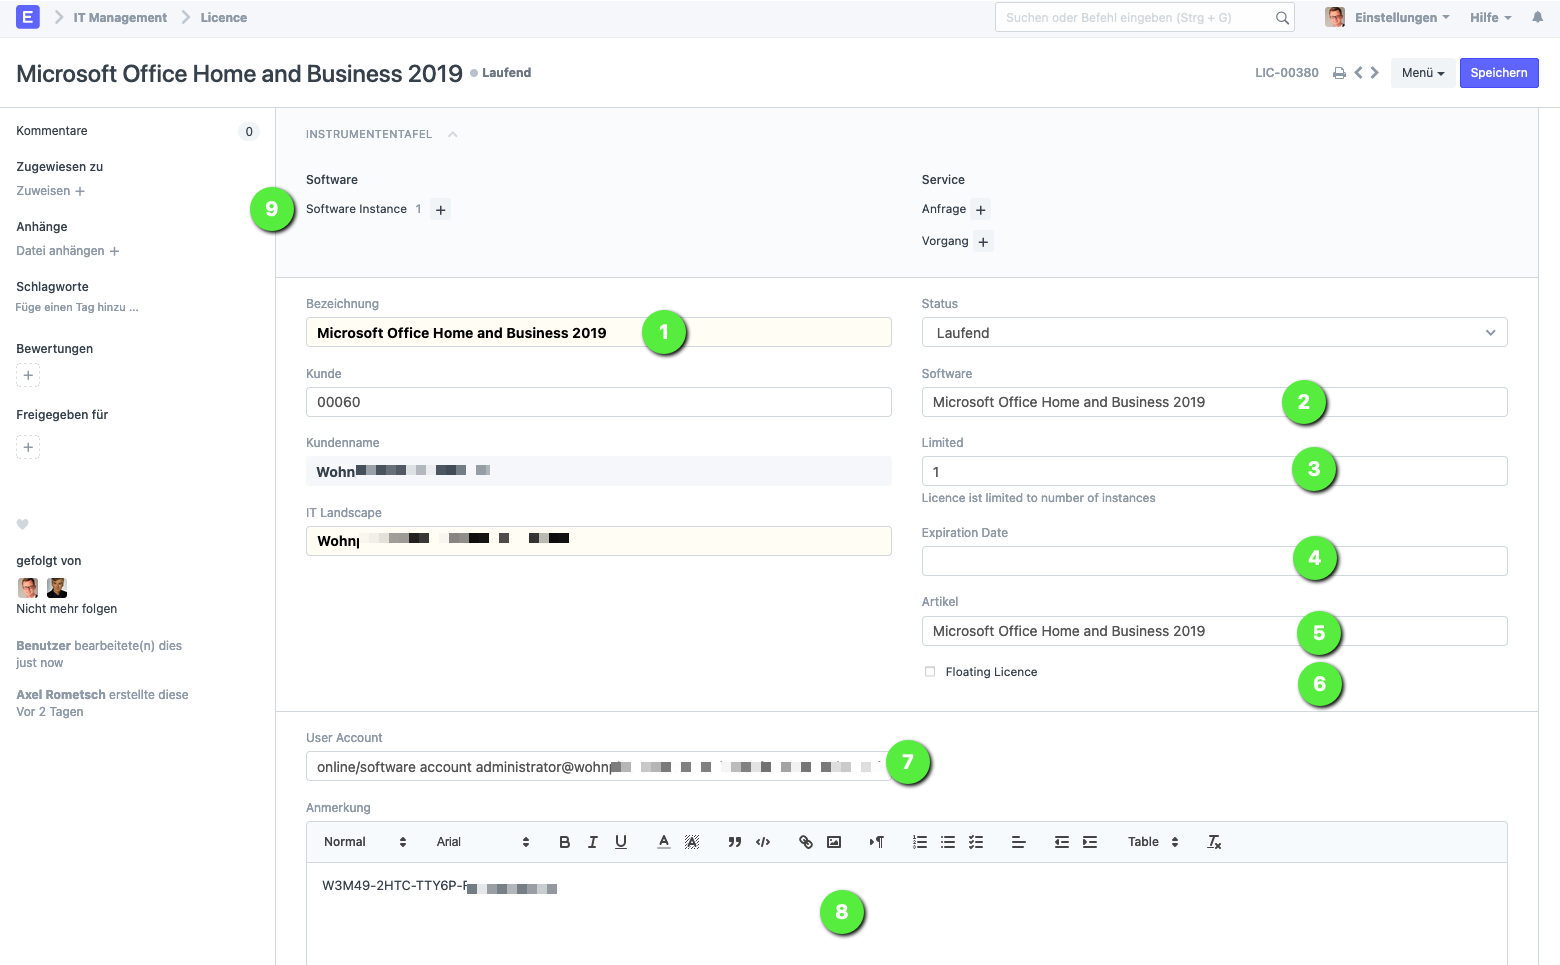
- die Bezeichnung entspricht der Software (2)
- Eine Verknüpfung zur entsprechenden Software für welche diese Lizenz gilt
- Das Limit in wie vielen Lizenzen
- Das Datum bis wann die Lizenz gültig ist
- Eine Verknüpfung zum Artikel wie er im Lager geführt wird. Dies ist für die Beschaffung.
- Markieren, ob die Lizenz "Floating" eingesetzt werden kann.
- Eine Verknüpfung zum Konto mit welchem die Lizenz fest verbunden ist. In diesem Beispiel ein Microsoft Account
- Als Anmerkung den Lizenzschlüssel eintragen. Wenn die Lizenz mehr als nur einen Schlüssel besitzt kann das hier eingetragen/vermerkt werden.
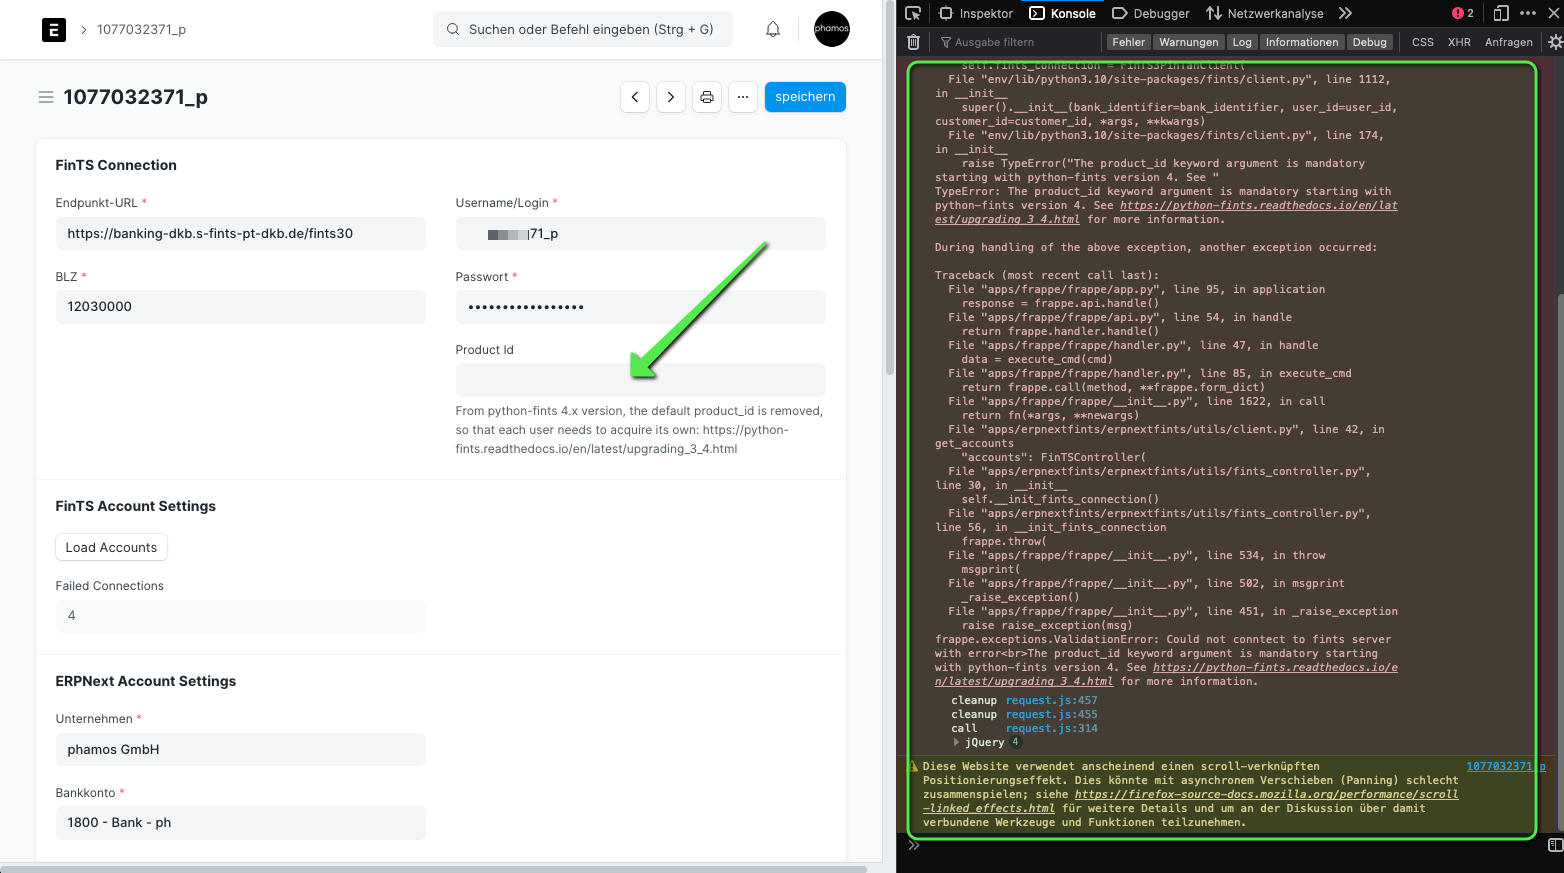
ERPNextFinTS
Über die Custom App FinTS kann die Hausbank über das HBCI Protokoll angebunden werden und den Abgleich von Zahlungen auf dem Konto und offenen Posten im ERP-System verwendet werden. Dies beschleunigt die Arbeiten in der Buchhaltung erheblich. Über eine Maske müssen dann nur noch unklare Zahlungen zugeordnet werden.
https://github.com/jHetzer/erpnextfints
DocTypes
Im folgenden Bild sehen wir die DocTypes welche für ERPNextFinTS eine Rolle spielen.
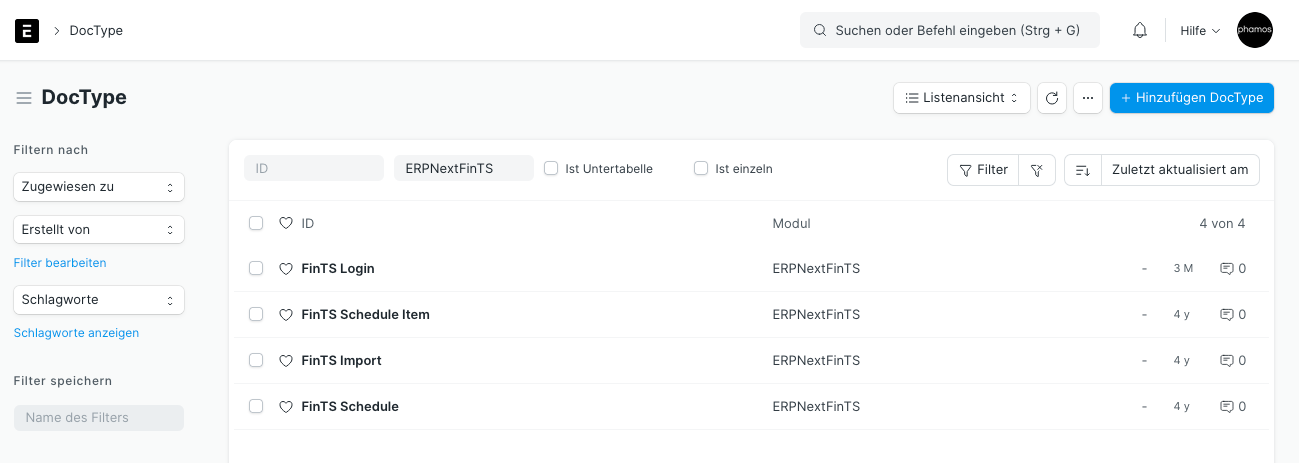
- FinTS Login
- FinTS Schedule Item
- FinTS Import
- FinTS Schedule
FinTS Login
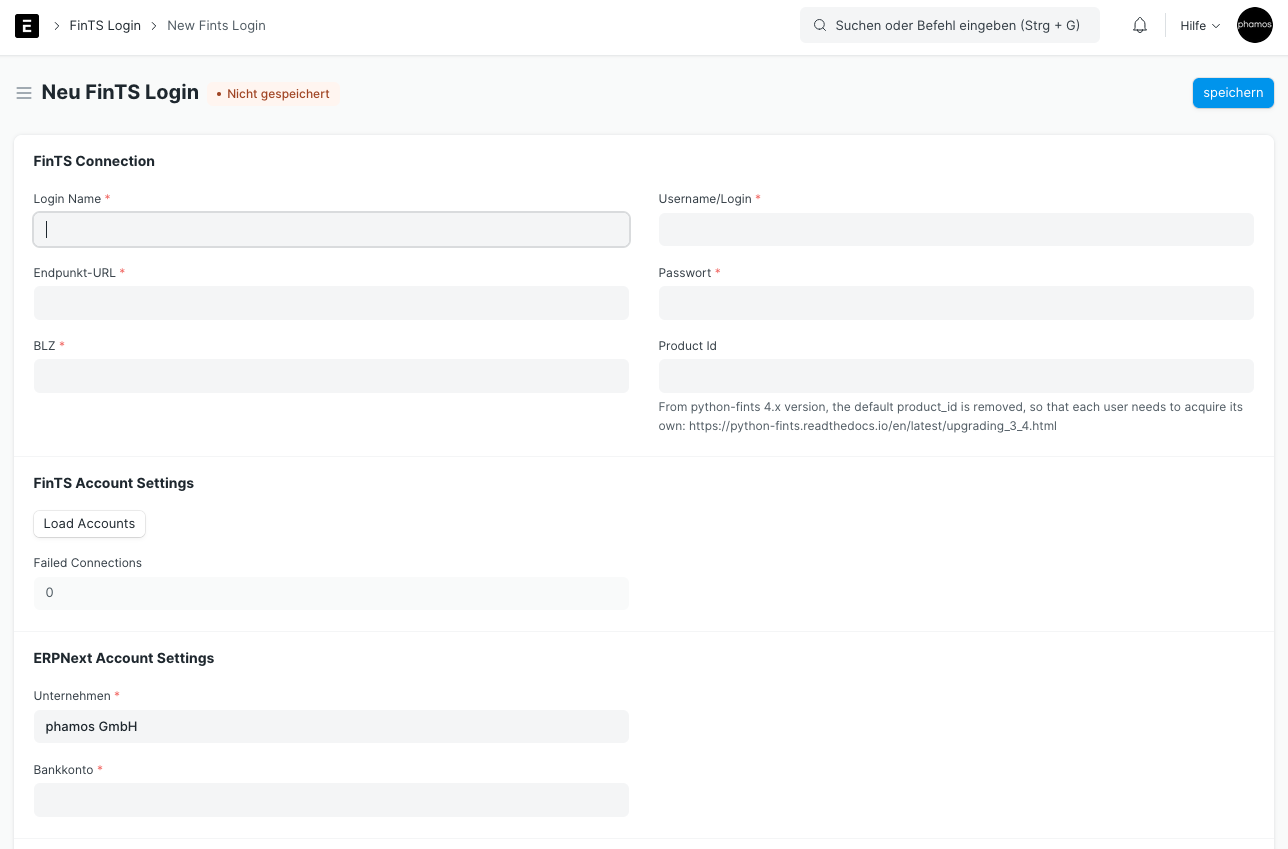
Ohne die Product ID läuft man in einen Fehler. Um diesen zu begeben wird eine Registrierungs-ID benötigt. Diese kann hier beantragt werden: https://www.hbci-zka.de/register/prod_register.htm
Links
Mögliche Alternative: https://doku.phamos.eu/books/erpnext-custom-apps/page/alyf-banking
nextcloud Integration
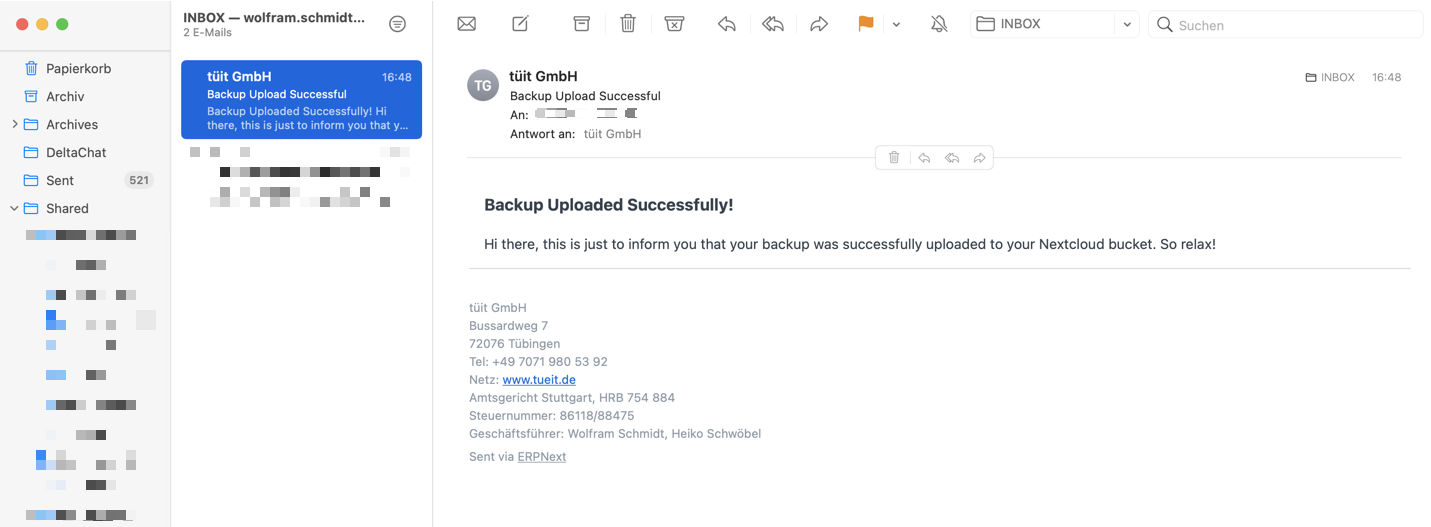
Einleitung
Diese App wurde durch tüit bei frappe in Auftrag gegeben. Die erste Version kann ein vollständiges Backup einer ERPNext Instand auf einen nextcloud Server erledigen. Dazu gibt es eine E-Mailbenachrichtung. Die Anbindung geschieht über einen WebDAV Pfad.
Im weiteren Verlauf sollen weitere Funktionen von nextcloud und ERPNext zusammen gebracht werden. Dazu gehören z.B. das syncen von tags. Ablagepfade für Anhänge auf nextcloud statt in ERPNext. DocType File 1:1 in nextcloud uvw.
https://github.com/frappe/nextcloud-integration
Backup
Hostel Gastgewerbe
https://github.com/Helkyd/front-desk
Item Translation
Für jeden Artikel können zusätzliche Artikelübersetzungen angelegt werden. Diese sind in Form eines neuen DocTypes "Item Translation"
Erstellen wir ein neues Angebot, können wir bei den angebotenen Artikeln eine Item Translation auswählen. Diese überschreibt dann Artikelname und Artikelbeschreibung i Angebotsartikel.
In der Druckansicht sehen wir Artikelname und Beschreibung wie ausgewählt.
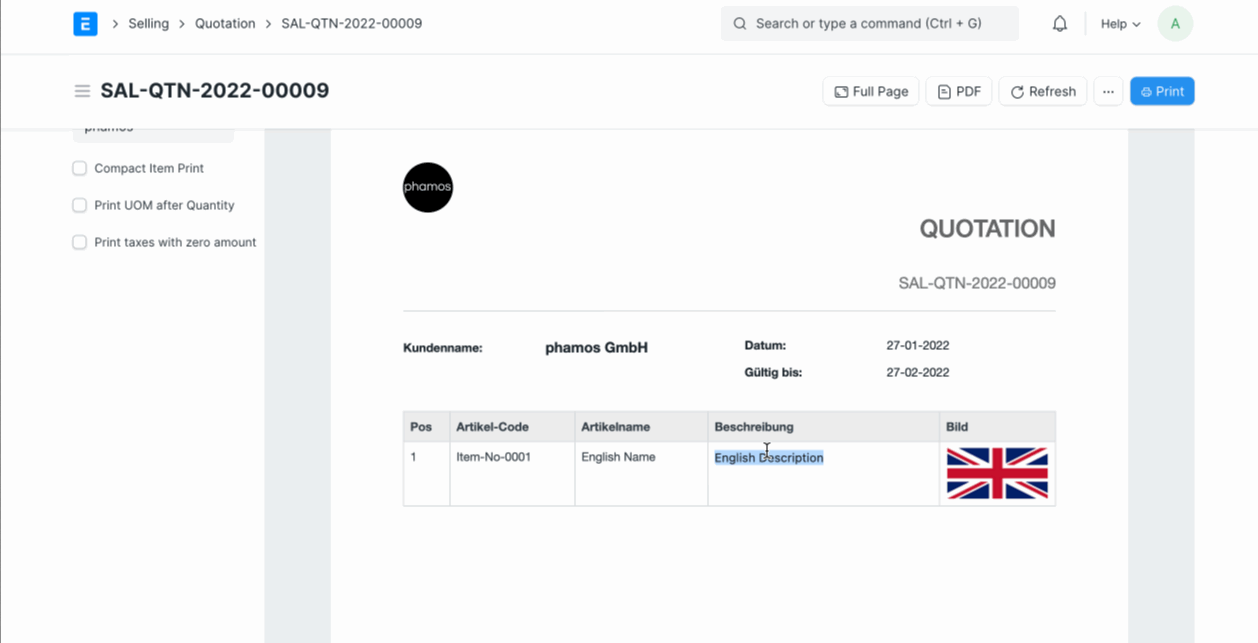
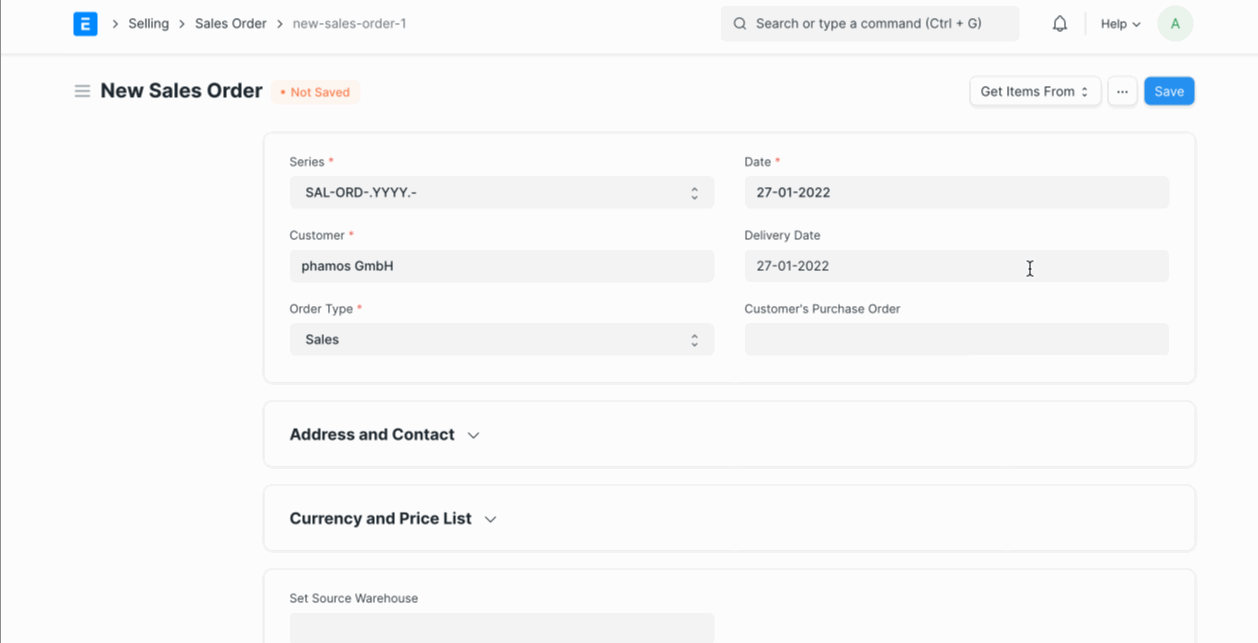
Erstellen wir aus dem Angebot einen Auftrag wird Artikelname und Artikelbeschreibung übernommen. und muss nicht zusätzlich angepasst werden.
PDF on Submit
https://github.com/alyf-de/erpnext_pdf-on-submit
Einleitung
Diese App erlaubt ein automatisches erstellen und anhängen eines Druckformats an diversen Dokumenttypen. Welche das sind kann in den PDF on Submit Settings eingestellt werden.
Das PDF selbst wird immer mit den Standards erstellt welche im entsprechenden DocType gesetzt sind.
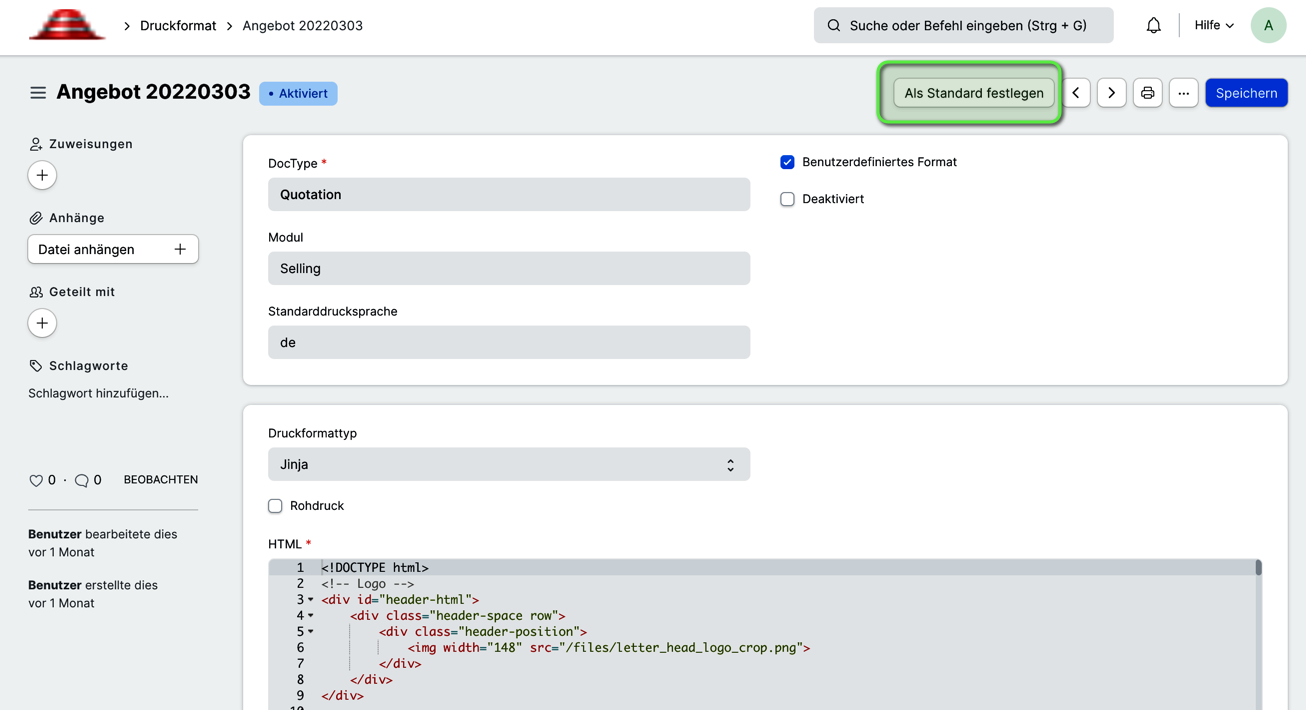
Sowie dem Standarddruckformat welches im Dokument über "Customize" eingestellt werden kann
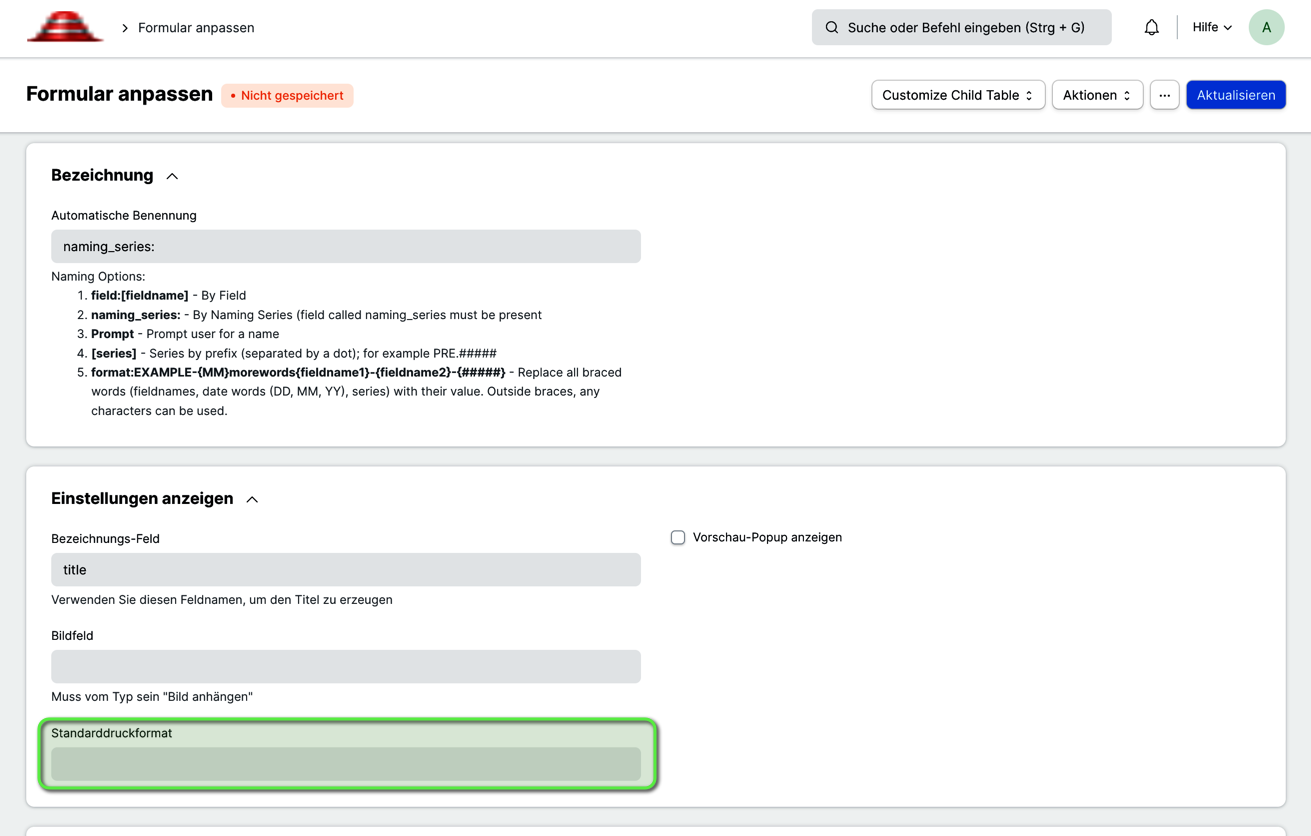
oder aber über das Druckformat als Standard setzen
DocTypes
PDF on Submit Settings

Die App in Aktion
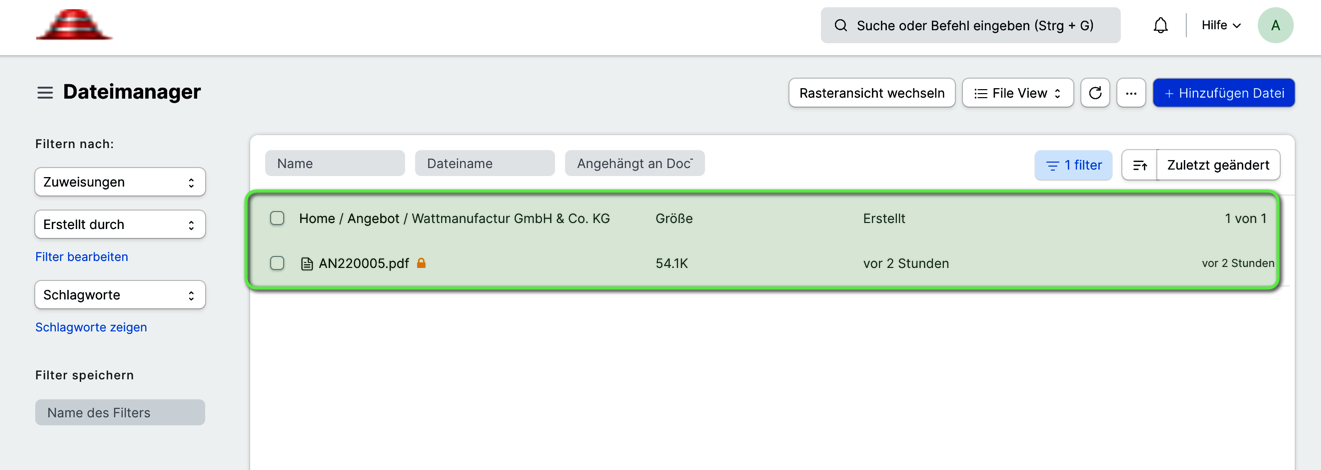
Die Ablage im System DocType Datei (File)
Alle Anhänge werden automatisch in einen Ordner gelegt welcher den Namen des entsprechenden Dokuments trägt.

In dem Ordner befindet sich ein Unterordner mit dem Names des Kunden
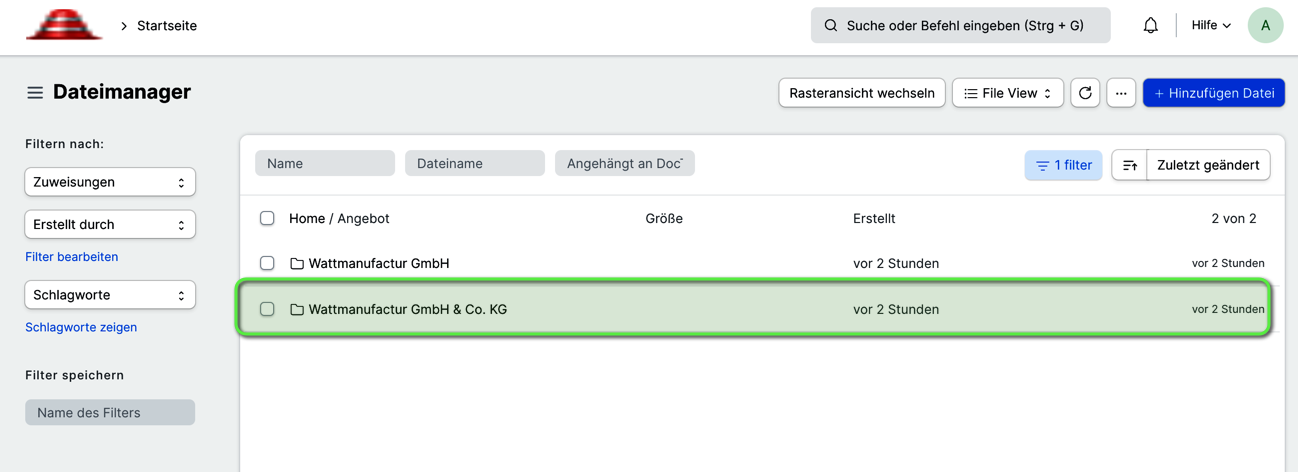
Und in diesem dann das PDF selbst
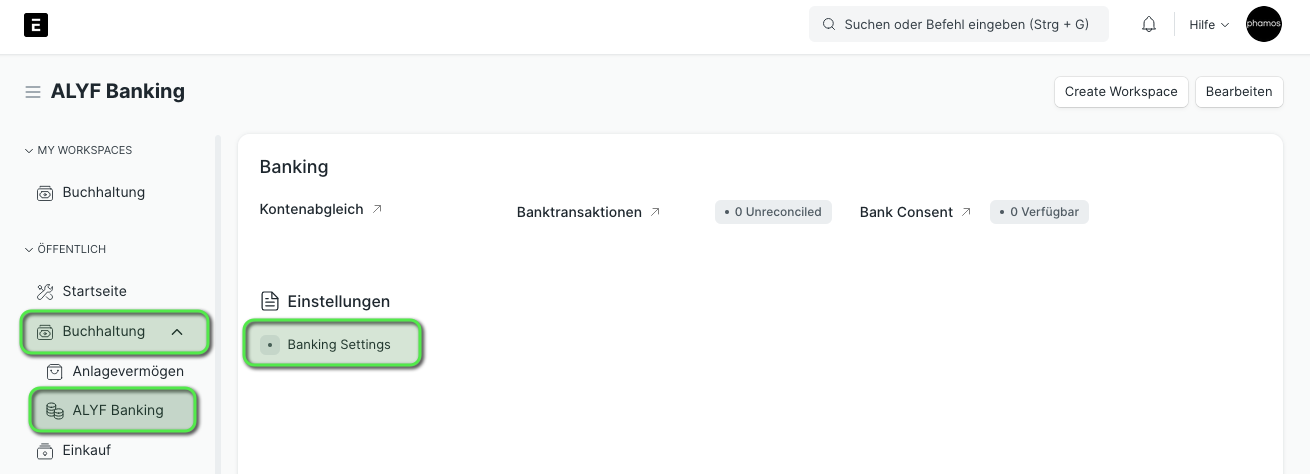
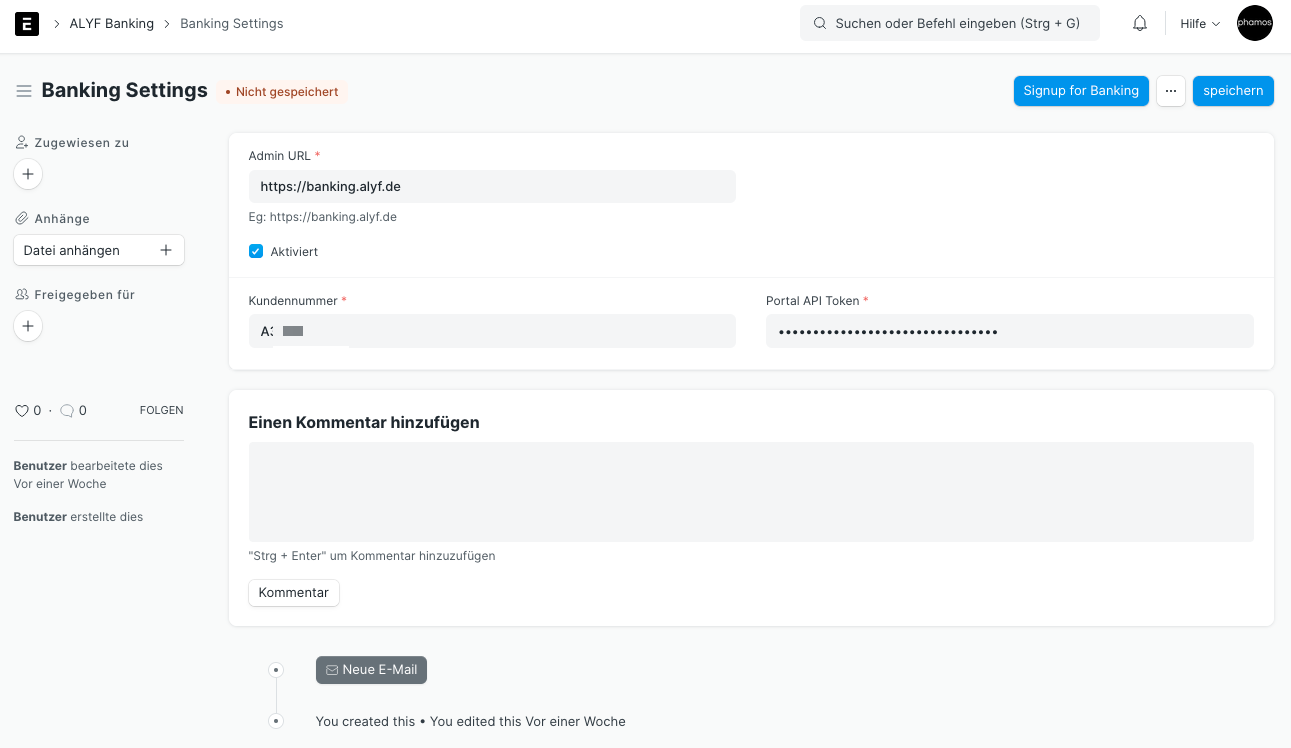
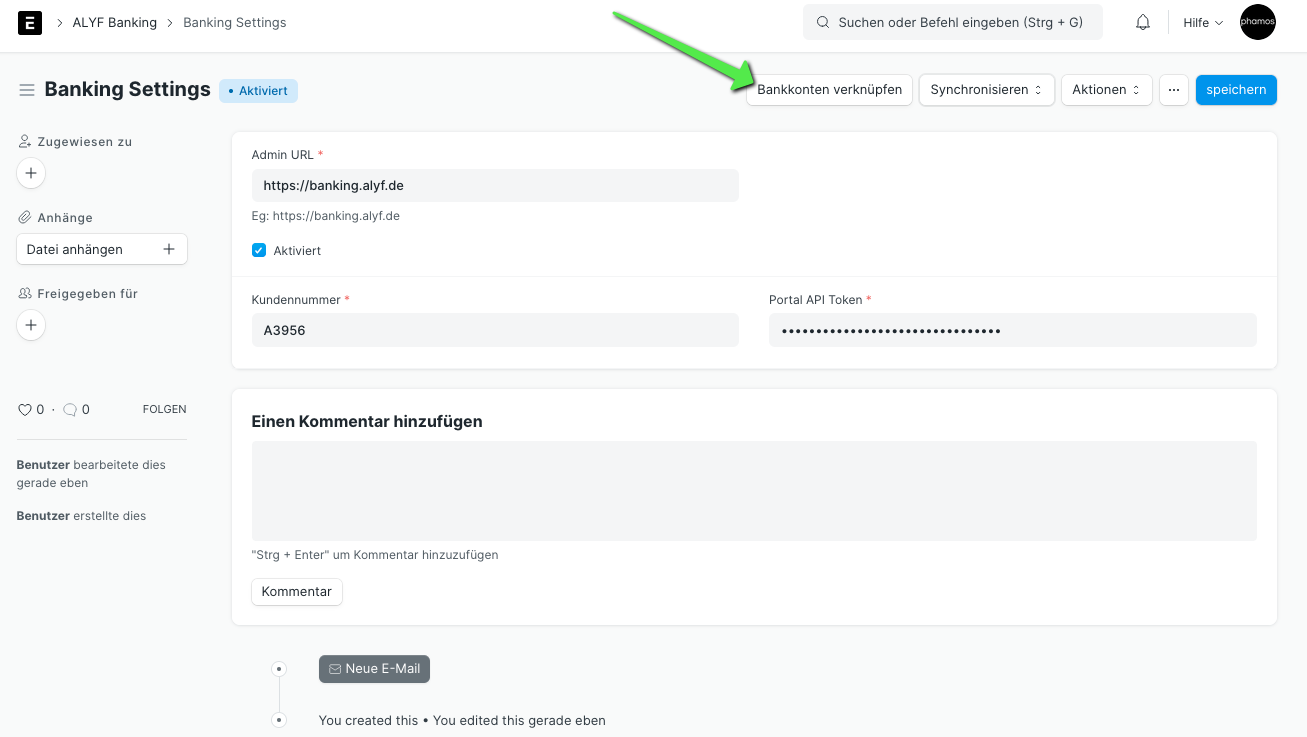
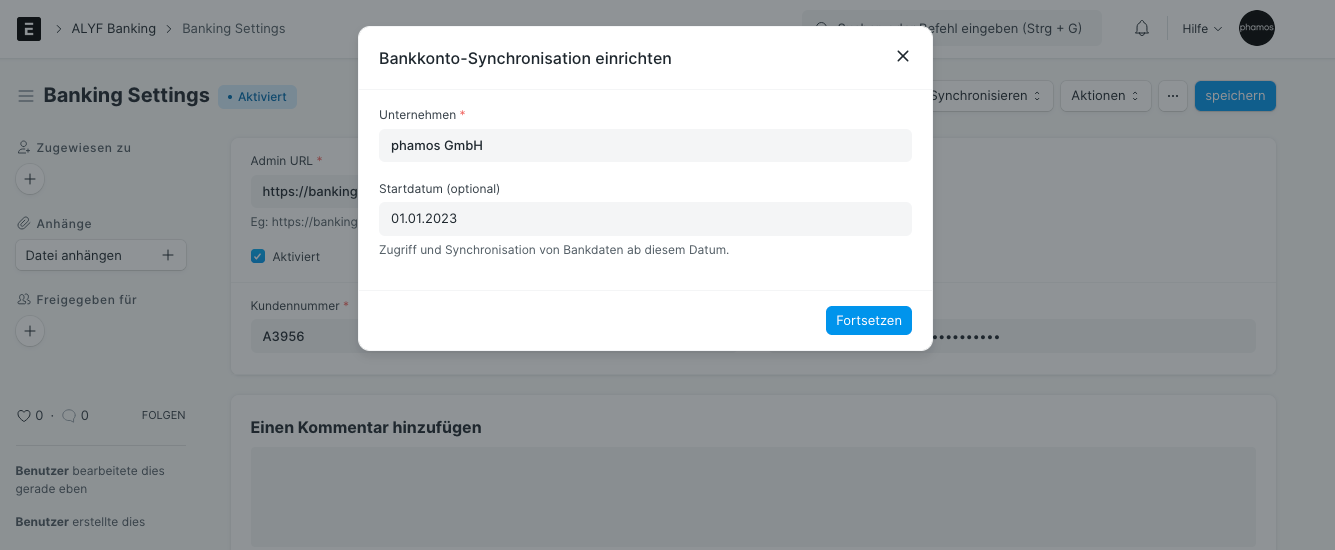
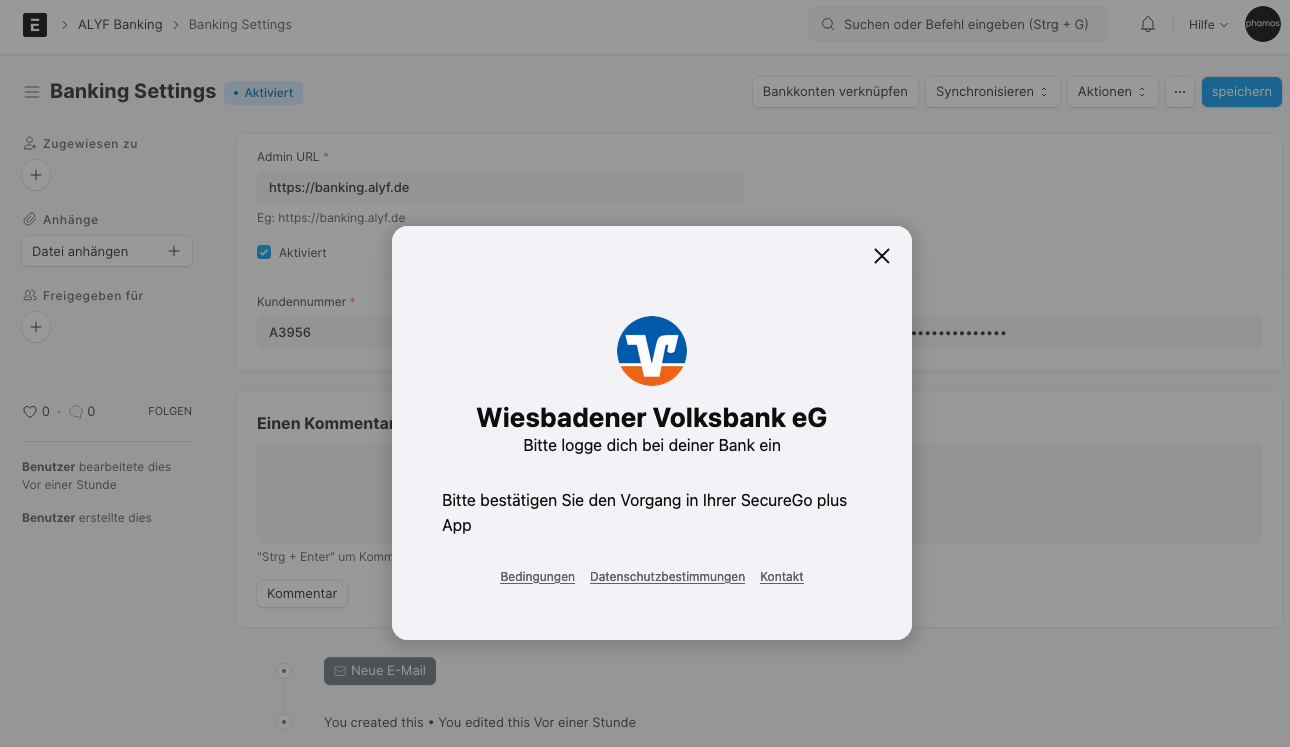
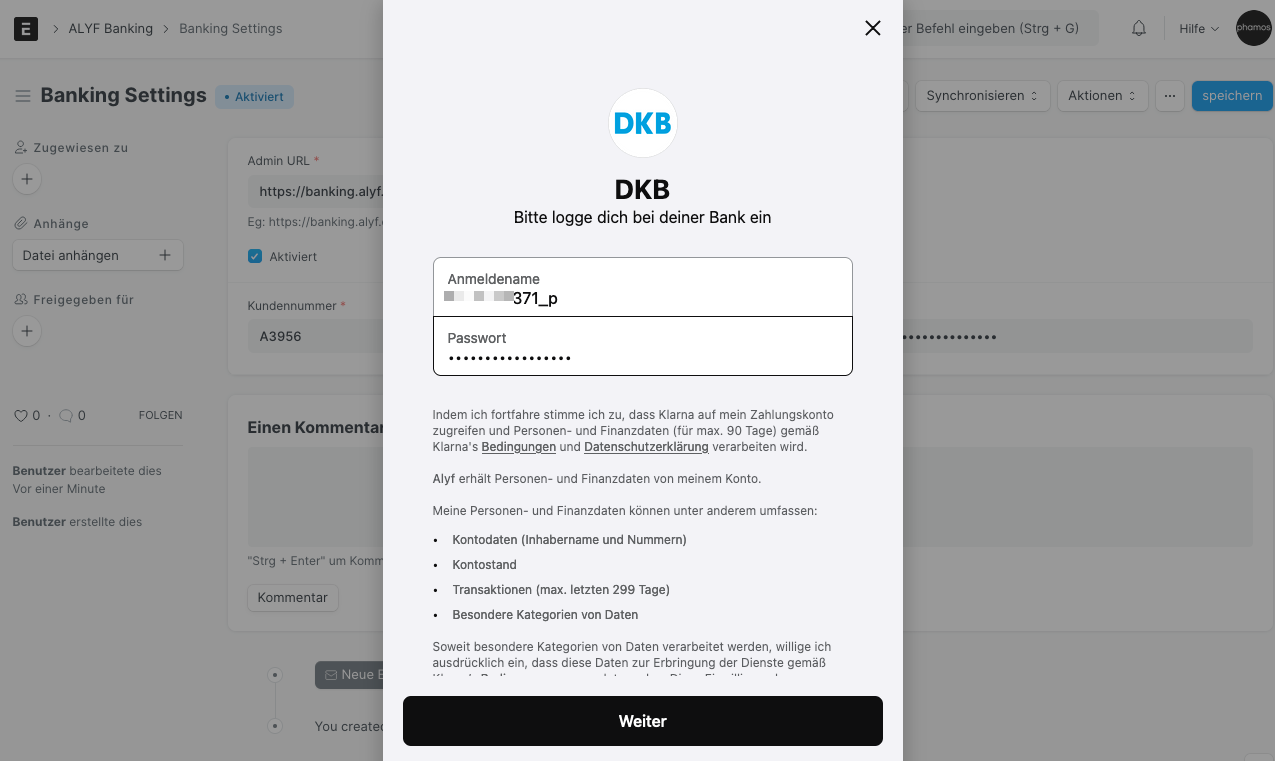
Alyf Banking
Einleitung
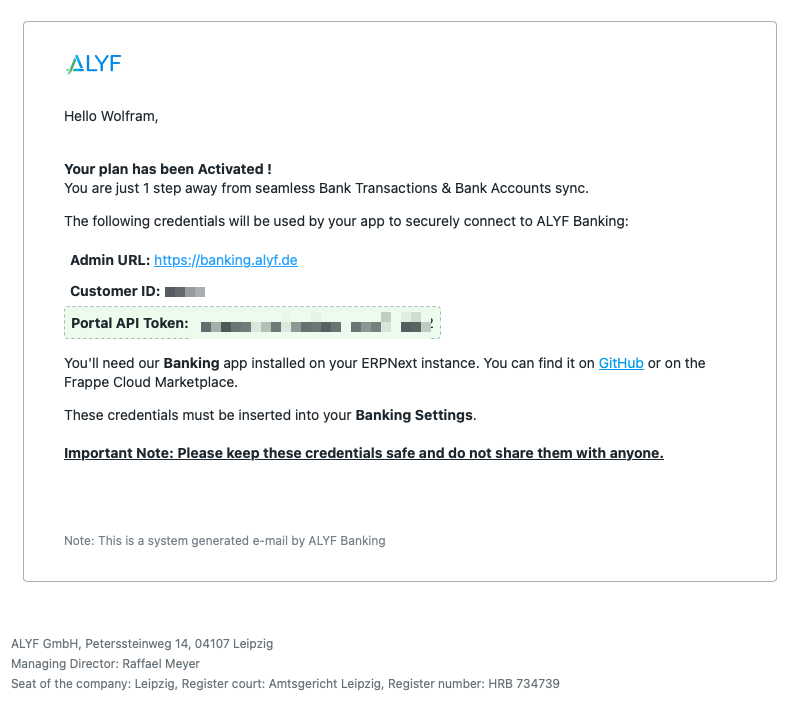
Login to ERPNExt and open
Wiesbadener Volksbank
DKB
Synchronisieren

Kefiya
Introduction
Kefiya is a customer app for ERPNext that will allow us to easily match our bank transactions to Sales Invoices and other transactions in our system.
This app is optimized for the german market but will also be able to foster processing of non-german banks if certain aspects are met. If you are looking to get your bank to work with the system contact our sales at https://phamos.eu/contact.
Kefiya Settings
On this page we can make overall settings that are relevant for the integration with ERPNext and the functionality of the custom app.
Importing Bank Transactions
via API
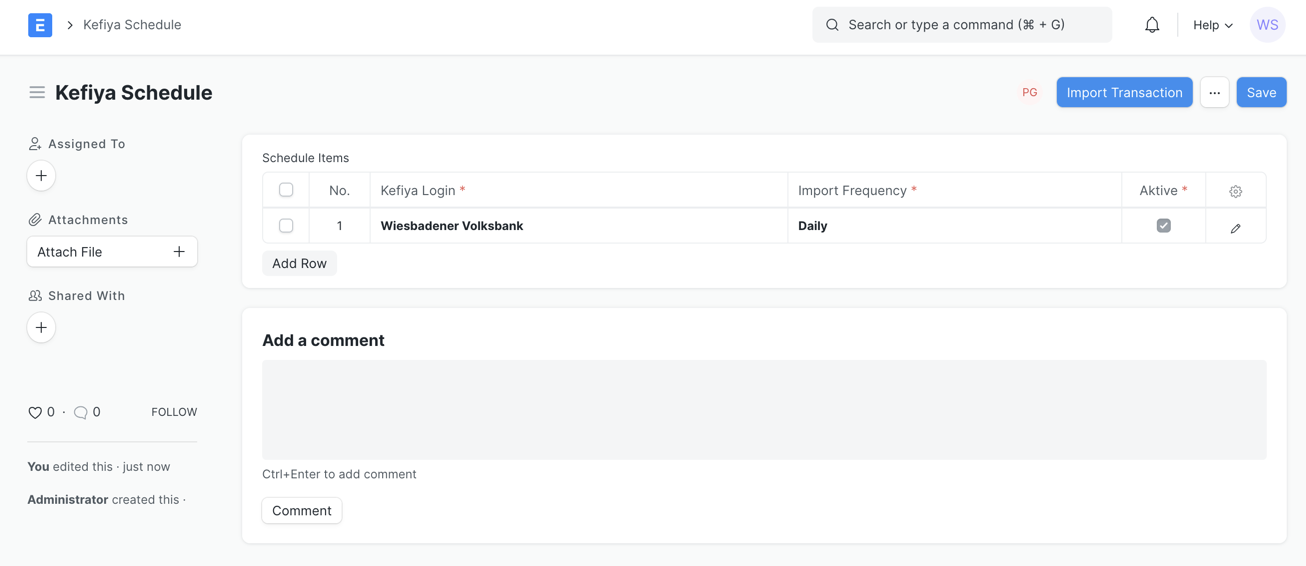
Kefiya Schedule
Here we can setup a schedule in what frequency data is fetched from the Kefiya Login. This
Manually
Bank Transaction
The Bank Transaction Doctype is a standard Doctype from ERPNext in which our uploaded bank statement date will be merged into.
Kefiya Bank Statement Import
This Docytpe is used to manually import *.csv files that we have downloaded from our bank. These *.csv files need a specific format to work. From the imported *.csv file we will be creating Bank Transaction records.
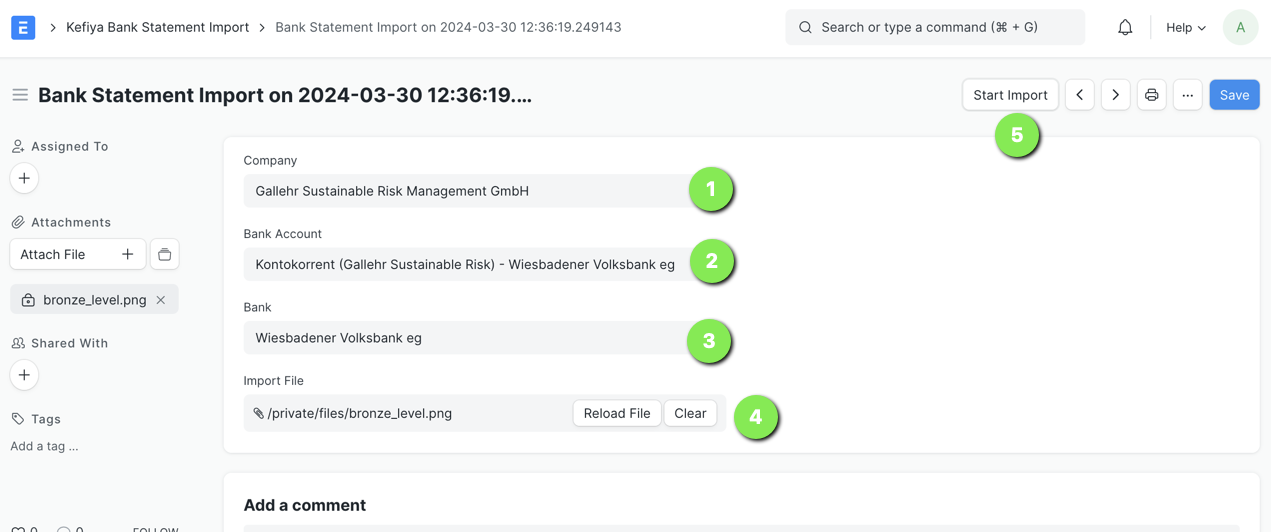
Actions
Start Import will create Transactions (Bank Transactions) in our system from the import file uploaded.
Fields
| Description |
Fieldname |
Explanation |
| Company |
company |
Link the company for which we will want to import the data for. |
| Bank Account |
bank_account |
Link the Bank Account from which the import data is from |
| Bank |
bank |
Link to Bank from bank_account |
| Import File |
import_file |
Here we can attach the file that shall be uploaded and where the transactions will be imported from. |
Banks that are included
- DKB (pending)
Bank Account Wizard
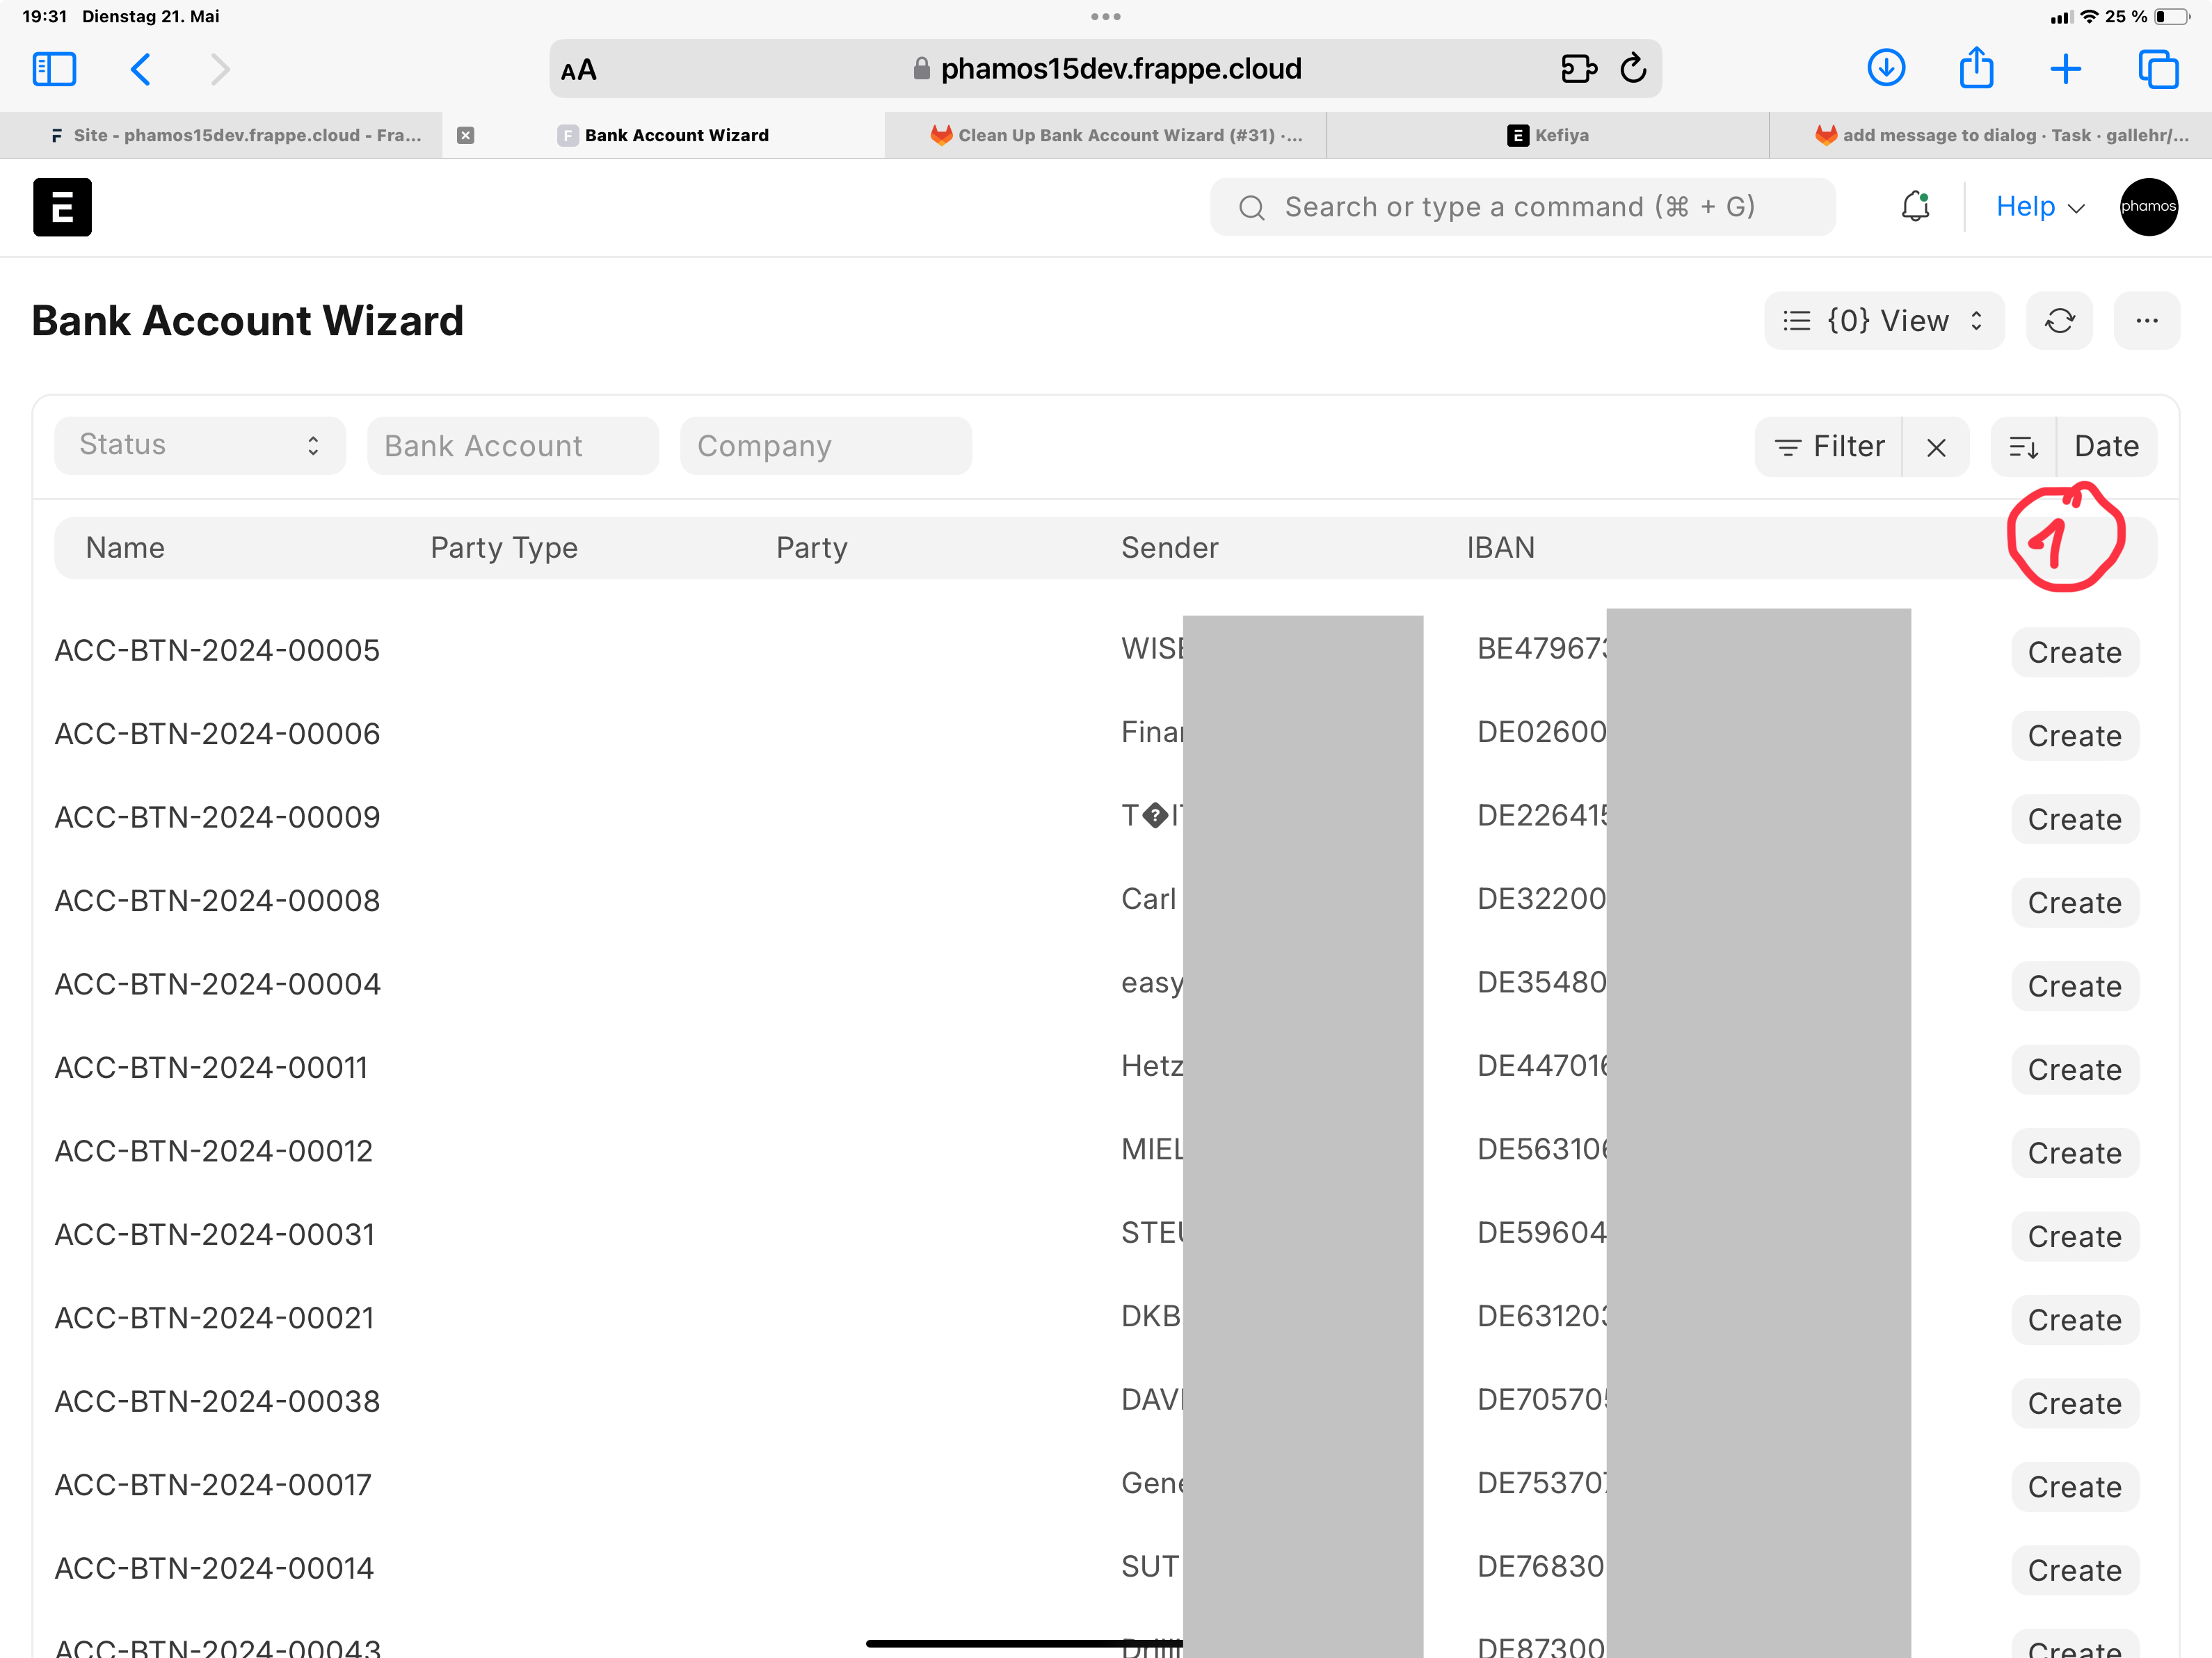
Now where Bank Transactions have been imported we are confronted with two cases. 1. The IBAN is known to our system and the Bank Transaction can be appended to a Bank Account record or 2. it can not be identified and we will need to create a new Bank Account record to which it can then be matched in future. For this we have the Bank Account Wizard.
Matching Process
One Bank Transactions are present in the system and are not fully reconciled they will be visible in a page that is designed to assign the records from the bank statement to unpaid Sales Invoices and other transactions in our system.
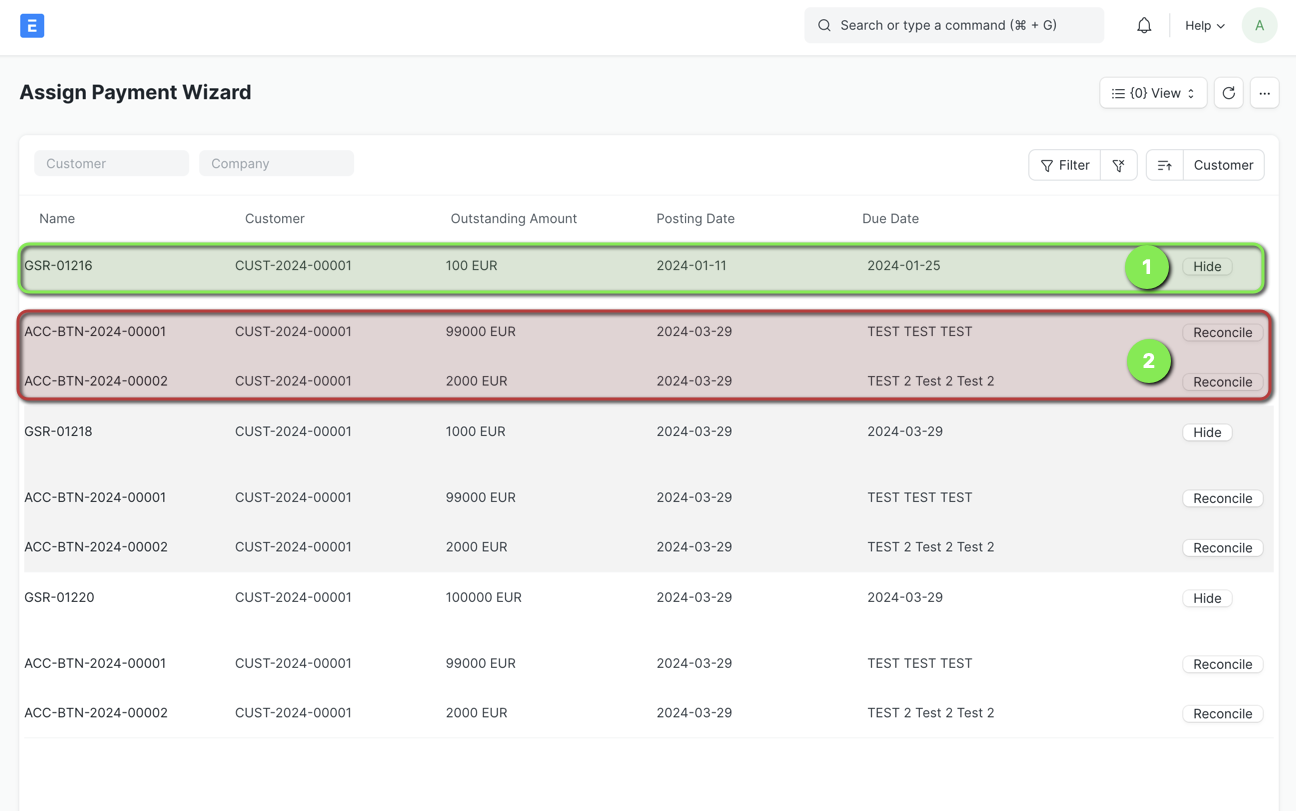
Assign Payments Wizard
Reconcile Payments
To quickly reconcile bank transactions towards sales invoices we use the Assign Payment Wizard. Here we see all Sales Invoices that are unpaid and respective bank transactions that might match. The matching process is done via the customer link. Read here for details on the matching process.
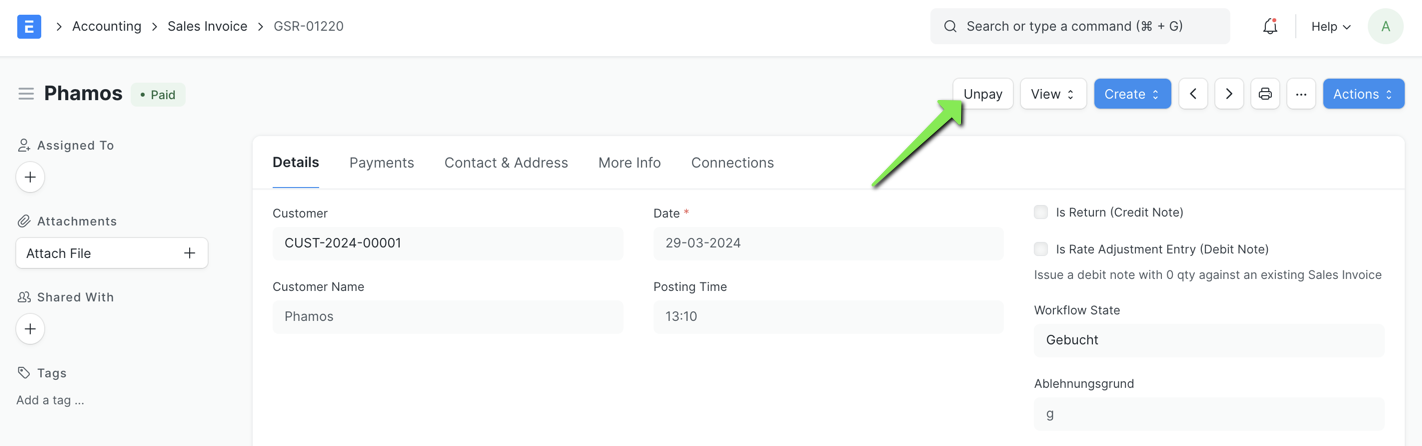
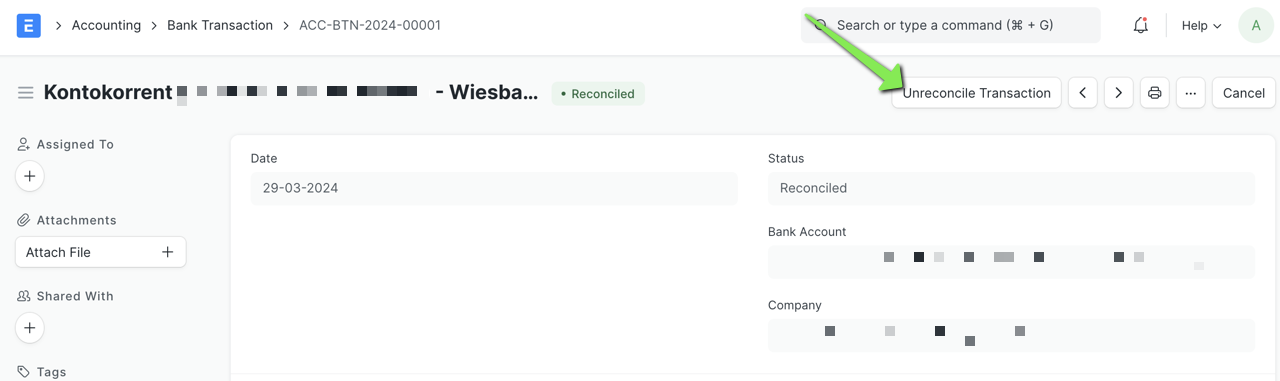
Unreconcile
In case we have wrongly reconciled a Bank Transaction towards a Sales Invoice we will want to undo our action. To do this we need to "Unpay" the Sales Invoice and "Unreconcile" the Bank Transaction. After that both records will reappear in the Assign Payment Wizard.
Unpay Sales Invoice
Unreconcile Bank Transaction
Webshop
Webshop Settings
Introduction
Fields
Explanation
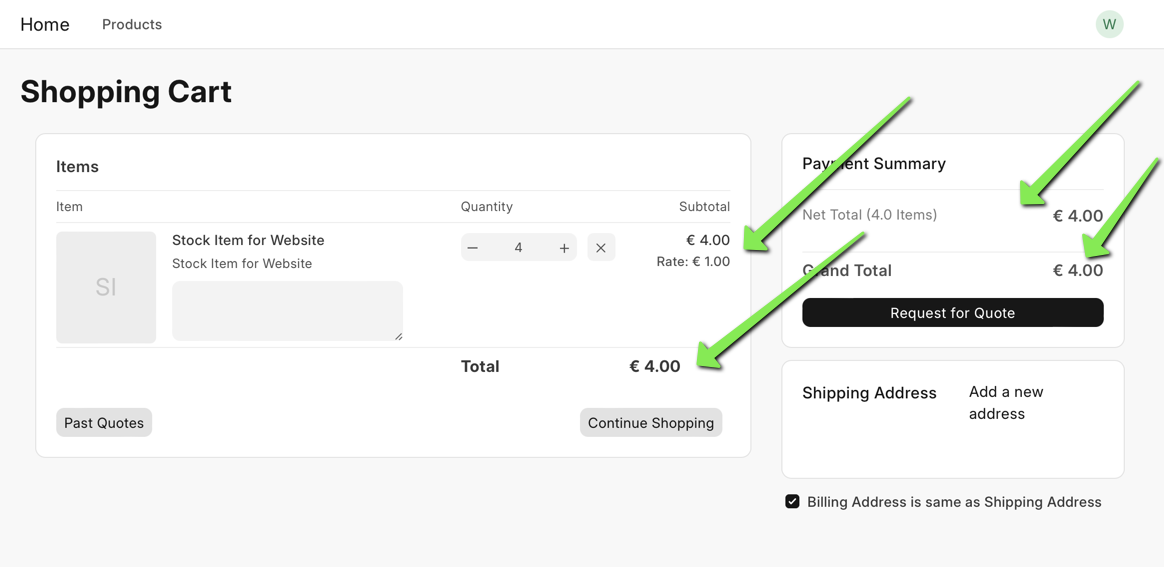
When activated the prices and totals will show in the Shopping Cart